OpenCV基本操作

#opencv
最近在复习和学习OpenCV这个库,罗列一下知识点供以后整理查阅
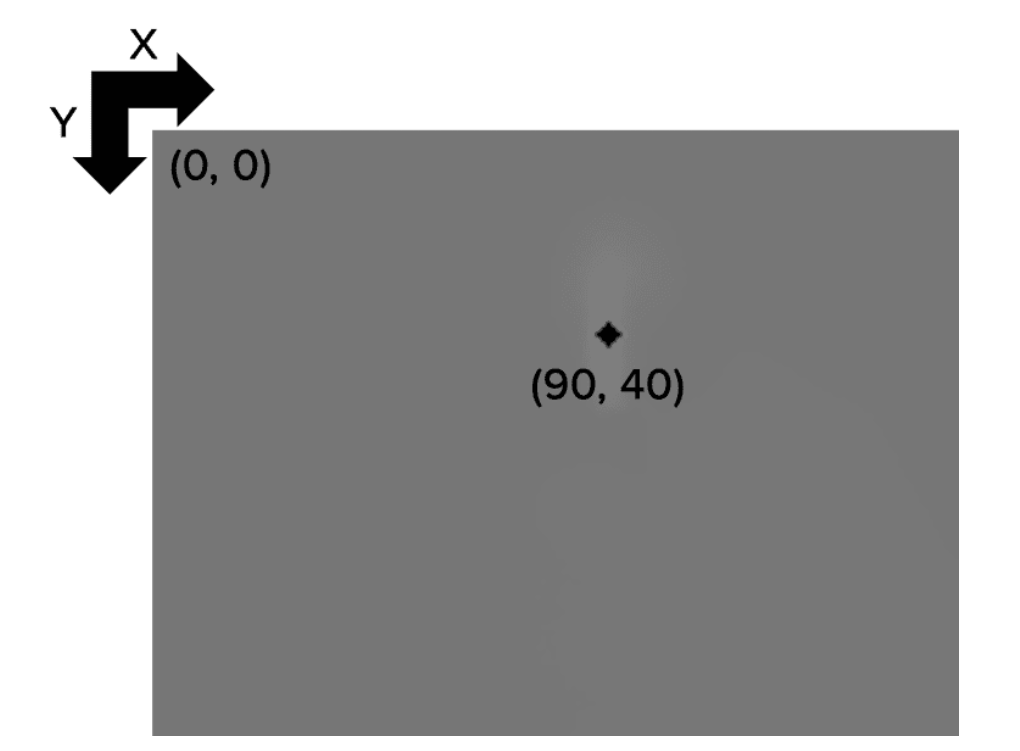
坐标关系
OpenCV坐标为x向右为正,y向下为负。在代码中表示一个坐标 先y后x
例如下面要选择x,y=(90,40)这个点
代码表示如下:
# pixel coordinates
x = 90
y = 40

pixel_flame_gray16 = gray16_image [y, x]
另外opencv读取的RGB图像的顺序是B,G,R
# images are simply NumPy arrays -- with the origin (0, 0) located at
# the top-left of the image
(b, g, r) = image[0, 0]
print("Pixel at (0, 0) - Red: {}, Green: {}, Blue: {}".format(r, g, b))
读取文件
使用cv2.imread 前3个维度分别为Height,width和channels
import argparse
import cv2
# construct the argument parser and parse the arguments
ap = argparse.ArgumentParser()
ap.add_argument("-i", "--image", required=True,
	help="path to input image")
args = vars(ap.parse_args())

# load the image from disk via "cv2.imread" and then grab the spatial
# dimensions, including width, height, and number of channels
image = cv2.imread(args["image"])
(h, w, c) = image.shape[:3]
# display the image width, height, and number of channels to our
# terminal
print("width: {} pixels".format(w))
print("height: {}  pixels".format(h))
print("channels: {}".format(c))

# show the image and wait for a keypress
cv2.imshow("Image", image)
cv2.waitKey(0)
# save the image back to disk (OpenCV handles converting image
# filetypes automatically)
cv2.imwrite("newimage.jpg", image)
裁剪操作

直接使用切片操作即可。例如需要提取一个图像的矩形区域,从(85,85)开始,到(220,250)结束。 OpenCV将图像表示为NumPy数组,高度在前(行编号#),宽度在后(列编号#)。
cropped = image[startY:endY, startX:endX]
import cv2

# load the input image and display it to our screen
image = cv2.imread('test.png')
cv2.imshow("Original", image)
# cropping an image with OpenCV is accomplished via simple NumPy
# array slices in startY:endY, startX:endX order -- here we are
# cropping the face from the image (these coordinates were
# determined using photo editing software such as Photoshop,
# GIMP, Paint, etc.)
face = image[85:250, 85:220]
cv2.imshow("Face", face)
cv2.waitKey(0)
算数操作
在进行图像运算时,需要注意颜色空间和数据类型的数值限制。通常来说,RGB图像的像素在[0, 255]范围内。如果在这个运算中超出这个范围,opencv和numpy的处理方法是不一样的。
- OpenCV 执行剪切,并确保像素值永远不会超出范围[0,255]。
- NumPy 执行模数运算和循环。例如265表示为9
import numpy as np
import cv2

# images are NumPy arrays stored as unsigned 8-bit integers (unit8)
# with values in the range [0, 255]; when using the add/subtract
# functions in OpenCV, these values will be *clipped* to this range,
# even if they fall outside the range [0, 255] after applying the
# operation

added = cv2.add(np.uint8([200]), np.uint8([100]))
subtracted = cv2.subtract(np.uint8([50]), np.uint8([100]))
print("max of 255: {}".format(added))
print("min of 0: {}".format(subtracted))
>>> max of 255: [[255]]
>>> min of 0: [[0]]

# using NumPy arithmetic operations (rather than OpenCV operations)
# will result in a modulo ("wrap around") instead of being clipped
# to the range [0, 255]

added = np.uint8([200]) + np.uint8([100])
subtracted = np.uint8([50]) - np.uint8([100])
print("wrap around: {}".format(added))
print("wrap around: {}".format(subtracted))
>>> wrap around: [44]
>>> wrap around: [206]
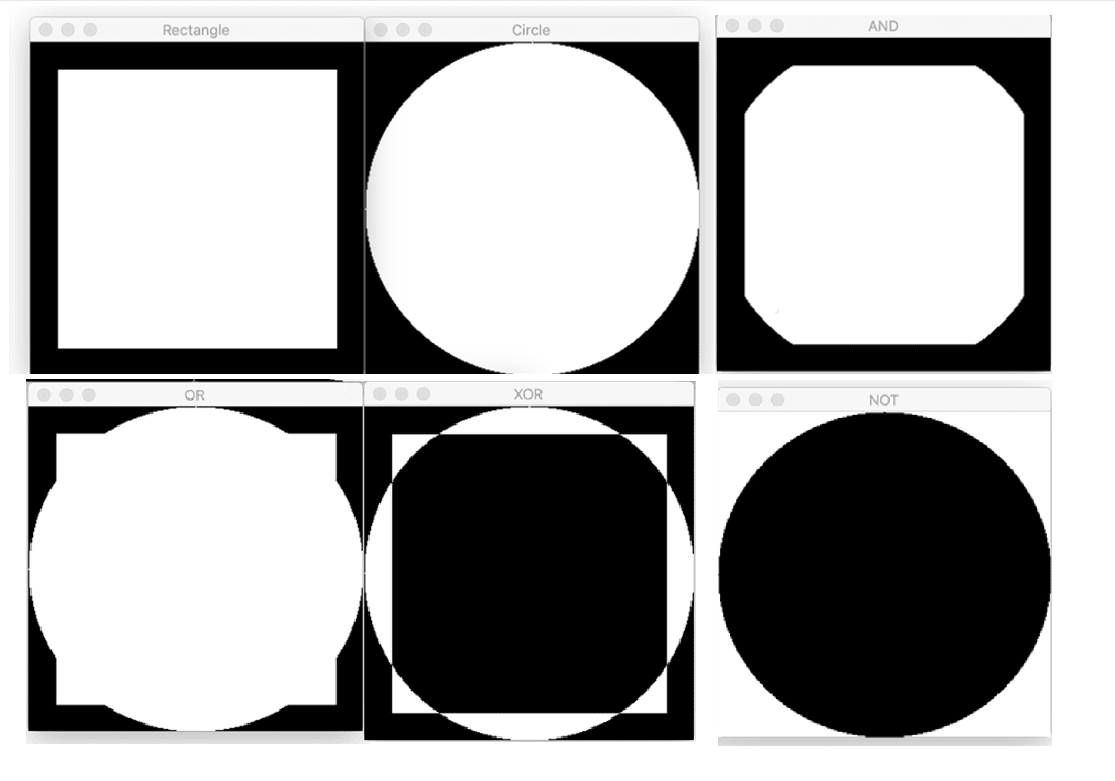
位运算AND, OR, XOR, and NOT
通常像素值0为黑,255为纯白,如果只有0和255,实际可以抽象为二值化图像。
opencv中处理逻辑运算使用命令bitwise_and, bitwise_or, bitwise_xor, bitwise_not.
import numpy as np
import cv2
# draw a rectangle
rectangle = np.zeros((300, 300), dtype="uint8")
cv2.rectangle(rectangle, (25, 25), (275, 275), 255, -1)
cv2.imshow("Rectangle", rectangle)
# draw a circle
circle = np.zeros((300, 300), dtype = "uint8")
cv2.circle(circle, (150, 150), 150, 255, -1)
cv2.imshow("Circle", circle)

# a bitwise 'AND' is only 'True' when both inputs have a value that
# is 'ON' -- in this case, the cv2.bitwise_and function examines
# every pixel in the rectangle and circle; if *BOTH* pixels have a
# value greater than zero then the pixel is turned 'ON' (i.e., 255)
# in the output image; otherwise, the output value is set to
# 'OFF' (i.e., 0)
bitwiseAnd = cv2.bitwise_and(rectangle, circle)
cv2.imshow("AND", bitwiseAnd)
cv2.waitKey(0)

# a bitwise 'OR' examines every pixel in the two inputs, and if
# *EITHER* pixel in the rectangle or circle is greater than 0,
# then the output pixel has a value of 255, otherwise it is 0
bitwiseOr = cv2.bitwise_or(rectangle, circle)
cv2.imshow("OR", bitwiseOr)
cv2.waitKey(0)

# the bitwise 'XOR' is identical to the 'OR' function, with one
# exception: the rectangle and circle are not allowed to *BOTH*
# have values greater than 0 (only one can be 0)
bitwiseXor = cv2.bitwise_xor(rectangle, circle)
cv2.imshow("XOR", bitwiseXor)
cv2.waitKey(0)

# finally, the bitwise 'NOT' inverts the values of the pixels;
# pixels with a value of 255 become 0, and pixels with a value of 0
# become 255
bitwiseNot = cv2.bitwise_not(circle)
cv2.imshow("NOT", bitwiseNot)
cv2.waitKey(0)
遮盖图像
本质上使用bitwise_and 操作即可
import numpy as np
import cv2
image = cv2.imread('test.png')
cv2.imshow("Original", image)
# a mask is the same size as our image, but has only two pixel
# values, 0 and 255 -- pixels with a value of 0 (background) are
# ignored in the original image while mask pixels with a value of
# 255 (foreground) are allowed to be kept
mask = np.zeros(image.shape[:2], dtype="uint8")
cv2.rectangle(mask, (0, 90), (290, 450), 255, -1)
cv2.imshow("Rectangular Mask", mask)
# apply our mask -- notice how only the person in the image is
# cropped out
masked = cv2.bitwise_and(image, image, mask=mask)
cv2.imshow("Mask Applied to Image", masked)
cv2.waitKey(0)
缩放scaling(resize)
当调整图像大小时,重要的是要记住宽度与高度比值,即图像的宽高比(aspect_ratio)。忽略纵横比可能会导致调整图像大小,看起来压缩和扭曲。另外图像放大过程需要注意插值(interpolation)方法。
cv2.resize
直接使用cv2.resize方法需要手动计算宽高比,以保证缩放比例正确
aspect_ratio = image_width / image_height
import numpy as np
import cv2
image = cv2.imread('test.png')

# 调整为150像素宽度
r = 150.0 / image.shape[1]
dim = (150, int(image.shape[0] * r))
# perform the actual resizing of the image
resized = cv2.resize(image, dim, interpolation=cv2.INTER_AREA)
cv2.imshow("Resized (Width)", resized)

# 调整为50像素高度
r = 50.0 / image.shape[0]
dim = (int(image.shape[1] * r), 50)
# perform the resizing
resized = cv2.resize(image, dim, interpolation=cv2.INTER_AREA)
cv2.imshow("Resized (Height)", resized)
cv2.waitKey(0)
imutils.resize
可以使用imutils自动调整大小功能
import imutils
import cv2
image = cv2.imread('test.png')
# calculating the ratio each and every time we want to resize an
# image is a real pain, so let's use the imutils convenience
# function which will *automatically* maintain our aspect ratio
# for us
resized = imutils.resize(image, width=100)
cv2.imshow("Resized via imutils", resized)
cv2.waitKey(0)
插值方法
cv2.INTER_NEAREST 最近邻域插值 cv2.INTER_LINEAR 双线性插值 cv2.INTER_AREA 区域间插值
以下为样条插值,使用情况较少,速度较慢 cv2.INTER_CUBIC based on a 4 x 4 pixel neighbor cv2.INTER_LANCZOS4 based on an 8 x 8 pixel neighborhood
通常,cv2.INTER_NEAREST非常快,但没有提供最高质量的结果。在非常受到资源约束的环境中,可以考虑该方法。
增加图像大小(上采样)时,考虑使用cv2.INTER_LINEAR 和 cv2.INTER_CUBIC。cv2.INTER_LINEAR 方法往往比 cv2.INTER_CUBIC 方法稍快,哪种更好自己尝试。
减小图像大小(下采样)时,OPENCV文档建议使用cv2.INTER_AREA。也可以使用cv2.INTER_NEAREST方法,但是cv2.INTER_AREA 通常效果更好。
最后,作为一般规则,建议使用cv2.INTER_LINEAR插值方法作为默认方法,上下采样都有较好的效果。
图像翻转cv2.flip
0表示垂直翻转(x轴),1表示水平翻转(y轴),-1表示两种操作都进行(180度)
import cv2
image = cv2.imread('test.png')
# flip the image horizontally
print("[INFO] flipping image horizontally...")
flipped = cv2.flip(image, 1)
cv2.imshow("Flipped Horizontally", flipped)

# flip the image vertically
flipped = cv2.flip(image, 0)
print("[INFO] flipping image vertically...")
cv2.imshow("Flipped Vertically", flipped)

# flip the image along both axes
flipped = cv2.flip(image, -1)
print("[INFO] flipping image horizontally and vertically...")
cv2.imshow("Flipped Horizontally & Vertically", flipped)
cv2.waitKey(0)
图像旋转
cv2.rotate
旋转原理
通常来说,旋转需要选择一个旋转中心和旋转角度,opencv还可以将图片进行缩放操作。
使用cv2.getRotationMatrix2D定义一个旋转矩阵,第一个参数为旋转中心点,第二个为旋转角度(顺时针),第三个为缩放尺度。注意:在OpenCV中,正度表示逆时针旋转,负度表示顺时针旋转。
使用cv2.warpAffine应用旋转,第一个参数是想要旋转的图像。之后指定旋转矩阵M和图像的输出维度(宽度和高度)。
```python
import cv2
image = cv2.imread('test.png')
# grab the dimensions of the image and calculate the center of the
# image
(h, w) = image.shape[:2]
(cX, cY) = (w // 2, h // 2)
# rotate our image by 45 degrees around the center of the image
M = cv2.getRotationMatrix2D((cX, cY), 45, 1.0)
rotated = cv2.warpAffine(image, M, (w, h))
cv2.imshow("Rotated by 45 Degrees", rotated)
# rotate our image by -90 degrees around the image
M = cv2.getRotationMatrix2D((cX, cY), -90, 1.0)
rotated = cv2.warpAffine(image, M, (w, h))
cv2.imshow("Rotated by -90 Degrees", rotated)
但是OpenCV并不会自动为我们整个旋转的图像分配空间以适应大小,可能会翻转到图像外面去。这个就需要调整cv2.warpAffine中的(w,h)来改变,比较麻烦。

imutils.rotate和imutils.rotate_bound
imutils.convenience.rotate 为一个封装的方法,代码显得简化许多。
import cv2
import imutils
image = cv2.imread('test.png')

# use our imutils function to rotate an image 180 degrees
rotated = imutils.rotate(image, 180)
cv2.imshow("Rotated by 180 Degrees", rotated)
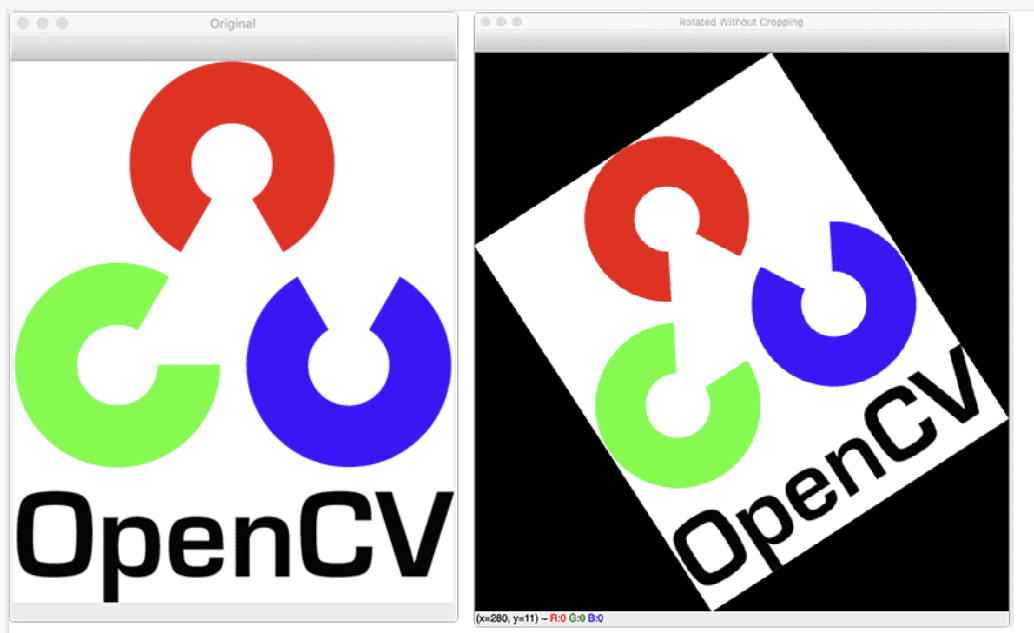
如果旋转过程中图像的一部分被切断,OpenCV不会分配足够的空间来存储整个图像,这时候可以使用imutils.convenience.rotate_bound解决
# rotate our image by 33 degrees counterclockwise, ensuring the
# entire rotated image still renders within the viewing area
rotated = imutils.rotate_bound(image, -33)
cv2.imshow("Rotated Without Cropping", rotated)
cv2.waitKey(0)
分离合并通道
使用cv2.split 和 cv2.merge即可
import cv2
import imutils
image = cv2.imread('test.png')
# load the input image and grab each channel -- note how OpenCV
# represents images as NumPy arrays with channels in Blue, Green,
# Red ordering rather than Red, Green, Blue
image = cv2.imread(args["image"])
(B, G, R) = cv2.split(image)
# show each channel individually
cv2.imshow("Red", R)
cv2.imshow("Green", G)
cv2.imshow("Blue", B)
cv2.waitKey(0)

# merge the image back together again
merged = cv2.merge([B, G, R])
cv2.imshow("Merged", merged)
cv2.waitKey(0)
cv2.destroyAllWindows()
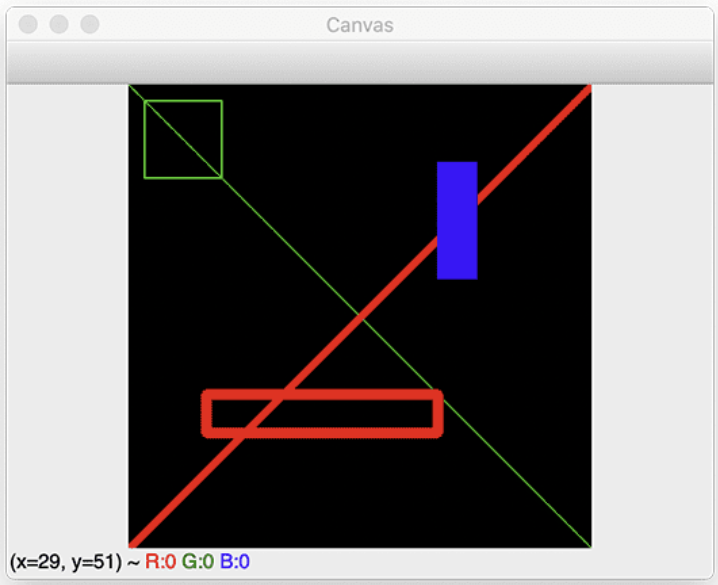
画图功能
常用命令
cv2.line: 在图像上绘制一条直线,从指定的(x, y)坐标开始,结束于另一个(x, y)坐标cv2.circle: 在由中心(x, y)坐标和提供的半径指定的图像上绘制一个圆cv2.rectangle: 在左上角和右下角(x, y)坐标指定的图像上绘制矩形 还有其他命令cv2.ellipse: 绘制椭圆形cv2.polylines: 绘制由一组(x, y)坐标指定的多边形的轮廓cv2.fillPoly: 绘制一个多边形,但不是绘制轮廓,而是填充多边形cv2.arrowedLine: 绘制一个箭头,从起始(x, y)坐标指向结束(x, y)坐标
# import the necessary packages
import numpy as np
import cv2
# initialize our canvas as a 300x300 pixel image with 3 channels
# (Red, Green, and Blue) with a black background
canvas = np.zeros((300, 300, 3), dtype="uint8")

# draw a green line from the top-left corner of our canvas to the
# bottom-right
green = (0, 255, 0)
cv2.line(canvas, (0, 0), (300, 300), green)
cv2.imshow("Canvas", canvas)
cv2.waitKey(0)
# draw a 3 pixel thick red line from the top-right corner to the
# bottom-left
red = (0, 0, 255)
cv2.line(canvas, (300, 0), (0, 300), red, 3)
cv2.imshow("Canvas", canvas)
cv2.waitKey(0)

# draw a green 50x50 pixel square, starting at 10x10 and ending at 60x60
cv2.rectangle(canvas, (10, 10), (60, 60), green)
cv2.imshow("Canvas", canvas)
cv2.waitKey(0)
# draw another rectangle, this one red with 5 pixel thickness
cv2.rectangle(canvas, (50, 200), (200, 225), red, 5)
cv2.imshow("Canvas", canvas)
cv2.waitKey(0)
# draw a final rectangle (blue and filled in )
blue = (255, 0, 0)
cv2.rectangle(canvas, (200, 50), (225, 125), blue, -1) #-1表示全部填充
cv2.imshow("Canvas", canvas)
cv2.waitKey(0)
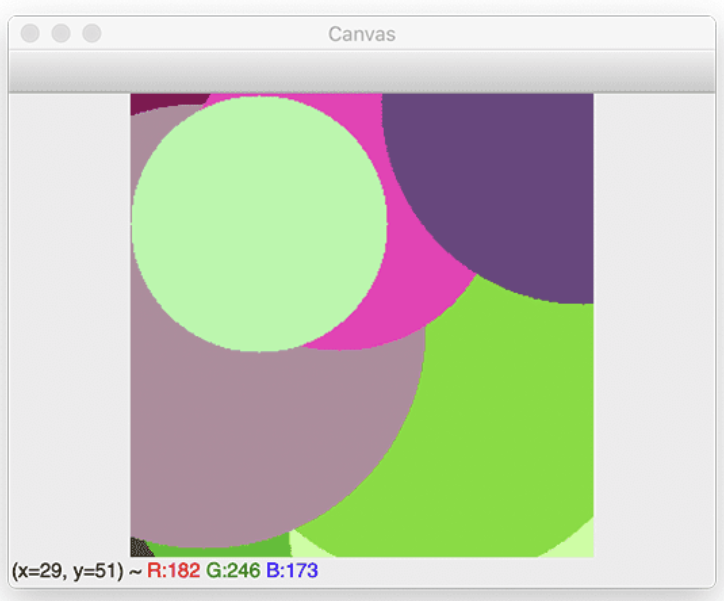
画圈
# re-initialize our canvas once again
canvas = np.zeros((300, 300, 3), dtype="uint8")
# let's draw 25 random circles
for i in range(0, 25):
	# randomly generate a radius size between 5 and 200, generate a
	# random color, and then pick a random point on our canvas where
	# the circle will be drawn
	radius = np.random.randint(5, high=200)
	color = np.random.randint(0, high=256, size=(3,)).tolist()
	pt = np.random.randint(0, high=300, size=(2,))
	# draw our random circle on the canvas
	cv2.circle(canvas, tuple(pt), radius, color, -1)
# display our masterpiece to our screen
cv2.imshow("Canvas", canvas)
cv2.waitKey(0)
图像平移
与图像旋转类似,需要先定义一个平移矩阵,之后使用cv2.warpAffine 方法进行调用
平移矩阵如下: 其中第一行表示左右移动,shiftX为负,向左移动,shiftX为正,向右移动。 第二行表示上下移动,shiftY为负,向下移动,shiftY为正,向上移动。
M = np.float32([
	[1, 0, shiftX],
	[0, 1, shiftY]
])
import cv2
image = cv2.imread('test.png')
# shift the image 25 pixels to the right and 50 pixels down
M = np.float32([[1, 0, 25], [0, 1, 50]])
shifted = cv2.warpAffine(image, M, (image.shape[1], image.shape[0]))
cv2.imshow("Shifted Down and Right", shifted)
同时也可以用imutils.translate方法,更加简洁一点。
# use the imutils helper function to translate the image 100 pixels
# down in a single function call
shifted = imutils.translate(image, 0, 100)
cv2.imshow("Shifted Down", shifted)
cv2.waitKey(0)